he LiveCode Server product brings our english like language to the server environment. The server engine is a separate build of the LiveCode engine with specific syntax and functionality that makes it suitable for use in command-line contexts and, in particular, as a CGI processor.
This lesson will walk you through the steps required to install LiveCode Server on Windows with Apache.
This lessons assumes you have access to your system's Apache configuration files. If you do not, see the the lesson Install LiveCode Server with Apache via .htaccess
Prerequisites[]
Before starting, read the lesson install LiveCode Server.
Apache is the most most popular web server package available today. Installing Apache will allow your machine to function as a web server, hosting websites and serving web pages. If you do not have Apache set up on your systems already, you will need to download and install the latest version. Apache installers for Windows can be found here: http://httpd.apache.org/download.cgi#apache22.
Apache can also be installed as part of a WAMP package (Windows Apache MySQL PHP). See this Wikipedia page for a comparison of WAMP packages available: http://en.wikipedia.org/wiki/Comparison_of_WAMPs.
By default, Apache comes with all the required modules enabled. If you are using a custom install of Apache, you will need to ensure that the following three modules are enabled:
Download LiveCode Server[]
Download and unzip the package into your desired location, for example in your home folder.
Set up Apache[]
Apache Server on WinXp
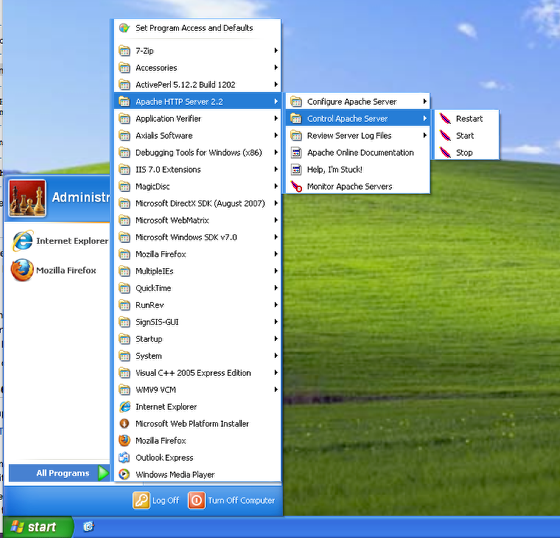
Once Apache has been installed, you can start and stop the service using the utilities accessible via the "Apache HTTP Server" entry in the Start menu. Select the "Control Apache Server" entry and click on "Start" to being running Apache. Your machine should now be functioning as a web server.
In addition to the Start menu entry, once running, Apache also provides a System Tray icon for managing the services. Here you can start and stop any Apache services running on your system
Setup LiveCode Server as a CGI engine[]

CGI installation
Next, you need to alter the Apache configuration file so that it associates .lc extensions with the LiveCode Server engine. To do this, open up the main Apache configuration file in WordPad. You can either do this using the Start menu shortcut shown in the image above or by navigating to the file directly. By default, the file is located at "C:\Program Files\Apache Software Foundation\Apache2.2\conf\httpd.conf".
Your "httpd.conf" file should contain an entry like the following:
DocumentRoot "C:/Program Files/Apache Software Foundation/Apache2.2/htdocs"
This details the folder where Apache looks for its web pages. This folder will have a directory directive that by default will look something like the following:
<Directory "C:/Program Files/Apache Software Foundation/Apache2.2/htdocs">
    #
    # Possible values for the Options directive are "None", "All",
    # or any combination of:
    #   Indexes Includes FollowSymLinks SymLinksifOwnerMatch ExecCGI MultiViews
    #
    # Note that "MultiViews" must be named *explicitly* --- "Options All"
    # doesn't give it to you.
    #
    # The Options directive is both complicated and important.  Please see
    # http://httpd.apache.org/docs/2.2/mod/core.html#options
    # for more information.
    #
  Options Indexes FollowSymLinks
    #
    # AllowOverride controls what directives may be placed in .htaccess files.
    # It can be "All", "None", or any combination of the keywords:
    #   Options FileInfo AuthConfig Limit
    #
  AllowOverride None
    #
    # Controls who can get stuff from this server.
    #
    Order allow,deny
    Allow from all
 </Directory>
Update this directory directive to look like the following:
<Directory "C:/Program Files/Apache Software Foundation/Apache2.2/htdocs">
    Options Indexes FollowSymLinks
    AllowOverride None
    Order allow,deny
    Allow from all
    AddHandler livecode-script .lc
    Action livecode-script /livecode-cgi/livecode-server.exe
 </Directory>
 <Directory "<path to LiveCode Server folder>">
    Options ExecCGI
    Order allow,deny
    Allow from all
 </Directory>
 ScriptAlias  /livecode-cgi/livecode-server.exe "<path to LiveCode Server folder>/livecode-server.exe"
Here <path to LiveCode Server folder> is the full path to the folder you unzipped the LiveCode Server files into.
Restart Apache[]

restart
Once you have updated your configuration file, you must restart Apache. You can do this either by using the utilities provided in the Start menu or by the using the "Restart" option System Tray icon as in the image above.
Create & view a web page[]

Test
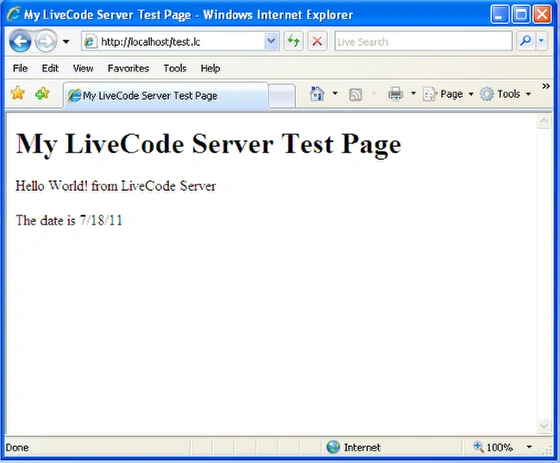
You are now ready to test your installation. To do this, create a file named test.lc in your document root folder. Your document root folder is defined in your Apache configuration file and can be found using the interactions defined in the step "Setting up LiveCode Server as a CGI engine". By default, this folder is located at "C:\Program Files\Apache Software Foundation\Apache2.2\htdocs\".
To access the test script, navigate to '''http://localhost/test.lc''' using your browser. The image shows the expected output if "test.lc" contains the following script:
<html>
   <head>
     <title>My LiveCode Server Test Page</title>
   </head>
   <body>
     <h1>My LiveCode Server Test Page</h1>
     <?lc
         put "<p>Hello World! from LiveCode Server</p>"
         put "<p>The date is" && the date & "</p>"
       ?>
   </body>
For more detailed information on installing LiveCode server, see the server release notes distributed with the server package. </html>