Android Setup[]
In order to develop an app on Android with Livecode you need the following free tools:
- Livecode: from http://livecode.com/download/
- Android Studio from https://developer.android.com/studio/index.html ( the smallest Android SDK now is just command line, so too difficult to use)
- If you are on Linux install the ia32-libs package, moreover
- suggested libraries can installed on deb package sytem with:
sudo apt-get install libc6:i386 libncurses5:i386 libstdc++6:i386 lib32z1 libbz2-1.0:i386
- on rpm systems with:
sudo yum install zlib.i686 ncurses-libs.i686 bzip2-libs.i686
- Java JDK from http://www.oracle.com/technetwork/java/javase/downloads/index.html
- Set in Livecode the Edit -> Preferences -> Mobile support locations of Android SDK inside android Studio and Java JDK.
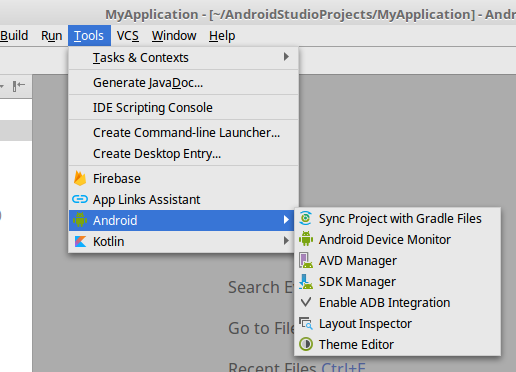
Check if the following menu items are available (not gray), otherwise install the missing components showed in the bottom of the Android studio.
Then probably you want to test you app with a "virtual phone". You can launch the Android AVD Manager (A.V.D. means Android Virtual Device), beware that an active virtual device it's very CPU and RAM consuming, so it's suggested to activate a virtual device on a multicore PC with 4GB or more of RAM.
Select an Arm image from other images, because livecode creates Arm apps (that works on quite every Android device):

However you can test your apps also with a old and slow PC, upload your app on your phone and click it with the phone file browser or upload on a website and download it on your Android device (phone or tablet) using the default browser, it will install the app on the device.
Then you have to start Livecode and go to Edit->Preferences->Mobile Support and select the path of your Android SDK and Java JDK. Paths is usually like: C:\Program Files\Android\android-sdk\ and C:\Program Files\Java\jdk1.7.0_45
(on linux is like /usr/lib/jvm/jdk1.7.0_45)
Now you can program in Livecode and create your app, testing it using the last button of Livecode toolbar "Test".
Remember that Android Virtual Device must be started manually in order to test your apps.
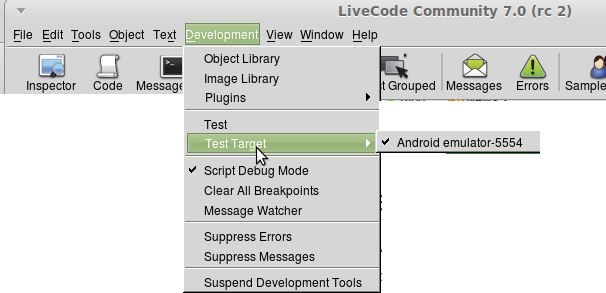
Now you have to specify to Livecode wich Device of the current runnings you want to use: go to Deleopment -> Test target and chosse the correct one, like the following image.
To install app, choose from File->Standalone application settings... -> Android -> Signing: sign for development only or sign with my key (and add your key in the next field); other sign options create invalid an app and it will not installed on phones.
You can create your personal key using the keytool proogram present in JDK bin/ directory. A typical command to create a keytool file is like:
keytool -genkey -v -keystore my-release-key.keystore -alias alias_name -keyalg RSA -validity 10000
Linux acceleration[]
Linux can accelerate the Android emulator, try to install these packages:
sudo apt-get install qemu-kvm libvirt-bin ubuntu-vm-builder bridge-utils ia32-libs-multiarch
sudo apt-get install cpu-checker
so you can test your CPU capabilities with:
$ egrep -c '(vmx|svm)' /proc/cpuinfo
12
$ kvm-ok
INFO: /dev/kvm exists
KVM acceleration can be used
Now, if you use the command line just add the option -accel-check
Windows 64bit[]
If you encounter some troubles in Windows 64bit intallation, follow these steps:
- Install jdk-8u20-windows-i586.EXE
- Install jdk-8u20-windows-x64.EXE
- Install Android SDK (usually in C:\Program Files (x86)\Android\android-sdk-windows)
- Install Android SDK tools
- Install Android API 2.2 (and all other API you need)
- Install Android all extras
- in Android SDK manager uncheck the check box that allow upgrade to Version 23.
- in Livecode set the correct path to Android SDK
- in Livecode set the Java path to C:\Program Files\Java\jdk1.8.0_20
How to sign with Java 7 (and JDK)[]
Note: read this chapter only if you have problem signing your app.
Java 7 changed way of signing method and livecode works with any version of java, but you if you encounter problem signing your app with livecode, read this chapter. If only you use your app, just set sign for development only, but if you want to distribute your app on a market, you need to sign it. These are the correct passages to manually sign your app:
- Create a program with livecode
- In File -> Standalone Application Settings... -> Android -> Signing choose do not sign
- Create the Android app with File -> Save as Standalone application (for example you obtained myApp.apk)
- Create a valid key with Oracle JDK keytool, this is the command on windows:
keytool.exe -genkey -v -keystore mykey.keystore -alias myalias -keyalg RSA -validity 10000
Keytool will ask you a lot of questions: please note that all answers supplied of the proposed questions by keytool must be different.
5. Sign the app with Oracle JDK jarsigner, this is the command on windows:
jarsigner.exe -sigalg MD5withRSA -digestalg SHA1 -verbose -keystore myKey.keystore myApp.apk myalias
That's all. Now your app is correctly signed.
Common errors[]
There was an error while saving the standalone application, could not compile application class.[]
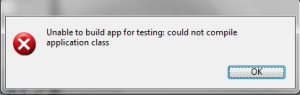
This is probably the most common error message – it generally occurs when your Android settings in LiveCode are not quite right. If you want to deploy your LiveCode app to an Android device, then you will need to install the Java SDK and the Android SDK on your machine. You can find detailed instructions on how to do this in the following LiveCode lessons – one for Mac, one for Windows, and one for Linux:
http://lessons.runrev.com/s/lessons/m/2571/l/27389-how-do-i-become-an-android-developer-on-a-mac
http://lessons.runrev.com/s/lessons/m/4069/l/27385-how-do-i-become-an-android-developer-on-a-pc
http://lessons.runrev.com/s/lessons/m/2571/l/80751-how-do-i-become-an-android-developer-on-linux
Once you have installed these packages, you need to make sure that the path to the Location of Android Development SDK root in your LiveCode preferences is correct.
Unable to build app for testing – could not generate package manifest.[]

This error is particularly tricky because it does not give enough information on what went wrong when the manifest file was generated. Every app must have a file named AndroidManifest.xml in its root directory. The manifest file presents essential information about your app to the Android system, information the system must have before it can run any of the app’s code. In LiveCode, this file is created based on the information provided in the standalone settings of the app. One of the fields in the standalone settings is the “Version Code.” This must always be a positive integer i.e. 1 and not 1.0 or -1!
This could also be caused by an incompatible icon selection in your "Basic Application Settings" section of the Android Standalone settings. Try clearing the selected icon and re-building.
Failure : [INSTALL_FAILED_UPDATE_INCOMPATIBLE][]
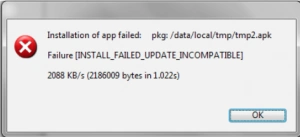
If you see this error, this means that the application that you want to install is already installed on the device. This usually happens when you already have a signed release version of the app on the device and you then try to deploy the debugged version to the device as well. The simple way to fix this problem is to remove the signed release version of the app from the device and then try to deploy the debugged version. Another solution would be to change the app identifier in the standalone application settings of the version that you are attempting to deploy to the device.
Failure : [INSTALL_FAILED_INCONSISTENT_CERTIFICATES][]
This error is quite similar to the previous one. It occurs when the signing key of the new copy of your application – on the machine that you are developing the app on – is not correct. It should be the same as the signing key on the old copy of your app, which is installed on the device. One of the reasons this could happen is that you developed the old copy of the app on a different machine. Another reason is that maybe the old copy of the app is signed with your production key and the newer version is signed with your debug key. The way to fix this problem is the same as in point 3: you can either remove the old copy from the device or change the app identifier in the standalone application settings and try again!
Parse error : There is a problem parsing the package[]

This error comes from the Android operating system (OS) when trying to install an app on the device and could be caused by different things. One cause is a corrupted .apk file – an Android Package Kit (APK) file is the file format used for installing software on the Android OS. If you are using LiveCode, however, the .apk cannot be corrupted and so something else must have gone wrong. The most likely cause, if you are using LiveCode, is that a setting on the device prevents the .apk file from being installed.
In order to solve this problem, make sure you have turned on “Allow installation of apps from Unknown Sources” on your device. You can do this by going to the device’s settings menu, selecting “Applications” OR “Security” (on the most recent Android versions) and checking the box of “Unknown Sources” to allow installation of apps from sources other than the Google Play store.
Android 05116c391513e851[]
I came across this error for the first time recently. It happened with a LiveCode stack that I had already deployed to my Android device several times. First, I double checked that the path to my Android SDK root was correct, but it turns out the problem was that I had accidentally turned off USB debugging on my device! Once I enabled USB debugging on the device, the error message disappeared.
To turn on USB debugging, go to the settings menu on your device and select “Developer Options” (you’ll need to scroll down to find this!). Enable “Developer Options,” then you can enable “USB debugging.”
APK preparation failed[]
Android aapt.exe 22.01 is bugged, it stops randomly. Upgrade your build tools.
App not installed. The package appears to be corrupt.[]
Some versions of Android need to uninstall the previous version of your app before installing the new version of your app.
Otherwise increase app build number.